

The second part of the Storybook-HTML tutorial introduced a Styleguide driven documentation and workflow. Very similar to Jina Bolton’s article about Writing an Interface Styleguide some years ago.
Now, the third part of this tutorial series explains, how you can configure Storybook to load HandlebarJS Templates and Scss files (styling specs). With this setup you will be able to have a ready to go interface development tooling. At the end, a simple Landing Page project by Jonas Duri is fully integrated in our Storybook environment. Let’s start!
Starting with a Landingpage
Again, Jonas Duri wrote a wonderful starter tutorial for a Landing Page with Handlebars.JS and Webpack 4. Our next steps are based on his tutorial and available github code.

I highly recommend to read his tutorial, before you continue with the next steps. If you are in hurry and want to start from this current point. then please git checkout the branch feature/add-landing-page-start of my Github Repo. Afterwards, follow these steps.
- Copy all files from the Gioni06/build-a-landing-page-with-webpack-4 repo within our Storybook project folder
- copy the complete “src” folder into our project folder
- copy the complete “build” folder into our project folder
- Install new dev-dependencies (edit and extend package.json)
- just run the command “npm install” in your terminal
- Split the webpack build files into common, dev and production mode for better a Developer UX. (that’s how I personally like it)
- Install dev-dependencies clean-webpack-plugin (see more)
- Disable webp configuration within image-webpack-loader
You can see all those changes in my two commits from January, the 13th. Just for double check everything, please run this command for development workflow with hot reload (you don’t have to press F5 anymore 😉
|
1 2 |
// run webpack in development mode with webpack dev server npm run dev |
If you want to bring your website to production, then run the building process.
|
1 2 |
// run and build your website (acts a little like static site generator) npm run build |
Wow, now you have a fully working Landing Page development environment. The npm build result is stored inside folder static-website folder, which you can upload on your webserver, or link your project to Netlify or GitHub pages deployment. Our build process behaves very similar to a pre-rendered static side renderd output with Webpack or a NuxtJS static-Side generation.
Integrate Storybook into your workflow
At the current state, we still suffer of a monolith and not modular development environment. Storybook to the rescue!
The Storybook installation and the website build tools are completely separated from each other. Storybook enhances your development experience, but doesn’t add any hard-wired dependencies (only dev-dependencies) to your project! You can test your Storybook installation with the terminal command ‘npm run storybook’. Everything should look like before. To get really started with development, we must configure Storybook for HandlebarJS and Sass files on the first step. Secondly, we include our templates into Storybook. Let’s start.
Add HandlebarJS to Storybook
It is pretty easy to enable the HandlebarJS Template engine into storybook. You just have to add the Handlebar-loader to the storybook webpack configuration, like this. Please go into the folder “.storybook” and add these few lines to Storybook Webpack configuration.
|
1 2 3 4 5 6 7 8 9 |
// Open the file within folder YourProjectFolder/.storybook/webpack.config.js ... defaultConfig.module.rules.push({ test: /\.handlebars|hbs$/, loader: "handlebars-loader" }); .... |
Now your Storybook is able to deal with HandlebarJS templates. If you work with another Template Engine, then please choose the appropiate Webpack Loader (Mustache, Twig , ESJ LoDash, Nunjucks, ERB) for it . As a prove forStorybook easy configuration, please check out the Twig starter example.
However, writing a Storybook story for Handlebar template is also very simple. Let’s write a story for our pretty complex Index Page Template:
|
1 2 3 4 5 6 7 8 9 10 11 |
// Open the file within folder YourProjectFolder/stories/index.stories.js ... // Import your handlebar Template import StartPage from "./../src/index.handlebars"; storiesOf("Components|Pages", module) .add("Home Landing Page", () => { let templateData = {}; return StartPage(templateData); }); ... |
Save your changes and run Storybook in Development Mode via terminal command:
|
1 2 |
// Within your terminal npm run storybook |
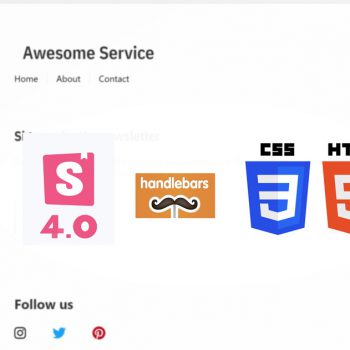
Unfortunately, the result didn’t meet the expected result. Below, the left side of the photo demonstrates my problem. The Handlebar template is rendering, but my (S)CSS is missing. Please terminate your Storybook process with “CTRL + C” shortcut within your terminal. We must add the Sass-loader within our Storybook Webpack configuration file.

Adding Sass (.scss) Style Rendering to Storybook
Please go back to the “.storybook” configuration folder and open its Webpack file. Copy those several lines from below and add them to our Webpack configuration. It is a good advice, to keep your web project Webpack configuration in sync with your Storybook Webpack configuration. Therefore, we added also the Post-CSS and CSS-loader to our our Storybook.
|
1 2 3 4 5 6 7 8 9 10 11 12 13 14 15 16 17 18 19 20 21 22 23 24 25 26 27 28 29 30 31 32 33 34 35 36 |
// Open the file within folder YourProjectFolder/.storybook/webpack.config.js ... defaultConfig.module.rules.push({ test: /\.(scss)$/, include: path.resolve(__dirname, "./../"), use: [ "style-loader", { loader: "css-loader", options: { sourceMap: true, importLoaders: 1 } }, { loader: "postcss-loader", options: { autoprefixer: { browsers: ["last 2 versions"] }, sourceMap: true, ident: "postcss", plugins: () => [autoprefixer] } }, { loader: "sass-loader", options: { sourceMap: true } } ] }); ... |
The next very important step is the import of your root .scss file inside your storybook config file!!
|
1 2 3 4 |
// Open the file within folder YourProjectFolder/.storybook/config.js ... import "../src/main.scss"; ... |
Without this one liner, your SCSS won’t show up in Storybook (see also this blog post at step 7). Now, start again your Storybook and voila, it should look like the above picture on the right side. The fully integration of all template files was a nice development experience for me. Try it by yourself too as an exercise. All introduced code changes here, can be explored here in this commit c41201b.
Sidestory to HTML-Storybook
I might repeat myself, but think the HTML Storybook project is a great development enhancer for working with those Template Engines (Mustache, Twig , ESJ LoDash, Nunjucks, ERB, etc.). The same is still true, when you use a different Tech Stack (like PHP, Ruby) or just a Static Site Generator for your template rendering. For instance, the web based user interface of OpenWRT (a open source router) is almost completely coded in Lua. A contributation to its user interface is for Web Designer and Web developer a big pain, due to its complex (hardware) deployment. The usage of a template engine, like Mustache for Lua, and a Mustache Webpack Loader in combination with Storybook would make the UI module development for that platform much easier. More Web Developer and Designer could become more interested in that project. Other embedded device environments and collaboration could benefit from such decoupled architecture. The designer and UI Engineer can use her/his familiar tools. In contrast, the (embedded/backend) software developer imports the UI templates and code all the other logic in their chosen Tech Stack (e.g Lua, Ruby, Go, etc.). Similar workflow could work out with your favourite Static Site Generator (e.g. run Middleman with ERB templates). Only one exception exists regarding working with lit-html templates in Storybook. The Storybook community highly recommends to use the Polymer Storybook Engines for lit-html and other Web Components (lit-element) oriented stuff. I have no practical experience in this field, so I would like to forward you to the Storybook community 🙂
Next steps
The HandlebarJS and Sass integration was my favourite part of this tutorial series. The minimal effort put in, has provided me a maximum on positive impact. The fourth part and next upcoming part deals with the refactoring of our templates to an Atomic Design oriented workflow. If you can’t wait so long, please check out the finished Github Repo and explore the project’s Storybook.